Wednesday, August 27, 2014

DIY'ing a Doggy Hammock

After my four-hour vacuum session to clean out our truck following our last camping trip, I desperately searched for an idea to guard the back seat from the piles of dog hair that had accumulated. I decided on a hammock style blanket. While there are some cute patterns on-line, I opted to wing it.

Before cruising over to JoAnn Fabrics for supplies, I swung into our local Salvation Army to see what was hanging out there. The local thrift stores are my bank account’s best friend…and worst enemy all at the same time.

I needed something that would get me a 60 x 90 inch rectangle in the end. Like a miracle, a 60 x 80 piece of fleece (with cute little paw prints all over it) appeared before my eyes. I also found a Twin size navy blue sheet that was large enough to make up the 10 inches the fleece was lacking and provide a back for my hammock.


I washed and dried both pieces before working with them. I started by lining up the fleece in the middle of the sheet length-wise with right sides together and then sewed along one side.


I pressed a five inch border into the top of the sheet and the bottom of the sheet to make up the 10 inch difference and then sewed along those sides. I had some extra sheet material along the remaining long edge, but I can’t cut a straight line to save my life so I folded the sheet over on itself to create a binding of sorts and sewed up the long side kind of haphazardly.

To attach the blanket in the back seat, I decided to use some nylon cording that I picked up at Hobby Lobby with a 40% off coupon.

A lot of the patterns I found on-line used buckles with the cording, but to save myself some expense and possible frustration, I figured I could just tie the nylon straps around each of our four headrests.

I cut the nylon to length and carefully melted the edges with a lighter so they wouldn’t fray. There may be a more civilized way to do that, but I'm certain it's not as fun!

I took the blanket out to the truck and marked where each strap needed to go. Then I attached each strap by sewing them onto the hammock with an x pattern to reinforce them.


The blanket lies flat on the bottom of the floor in the back seat and ties easily onto the head rests.


Since piecing together this contraption, we have had a chance to test it out and it worked really well.

It’s machine washable, so I just tossed it in the wash when we got home and spent only about half an hour vacuuming up the random dog hair that blew around the vehicle while we were traveling.

Here is a picture of the truck floor without the blanket...


And here is the floor after using the blanket...


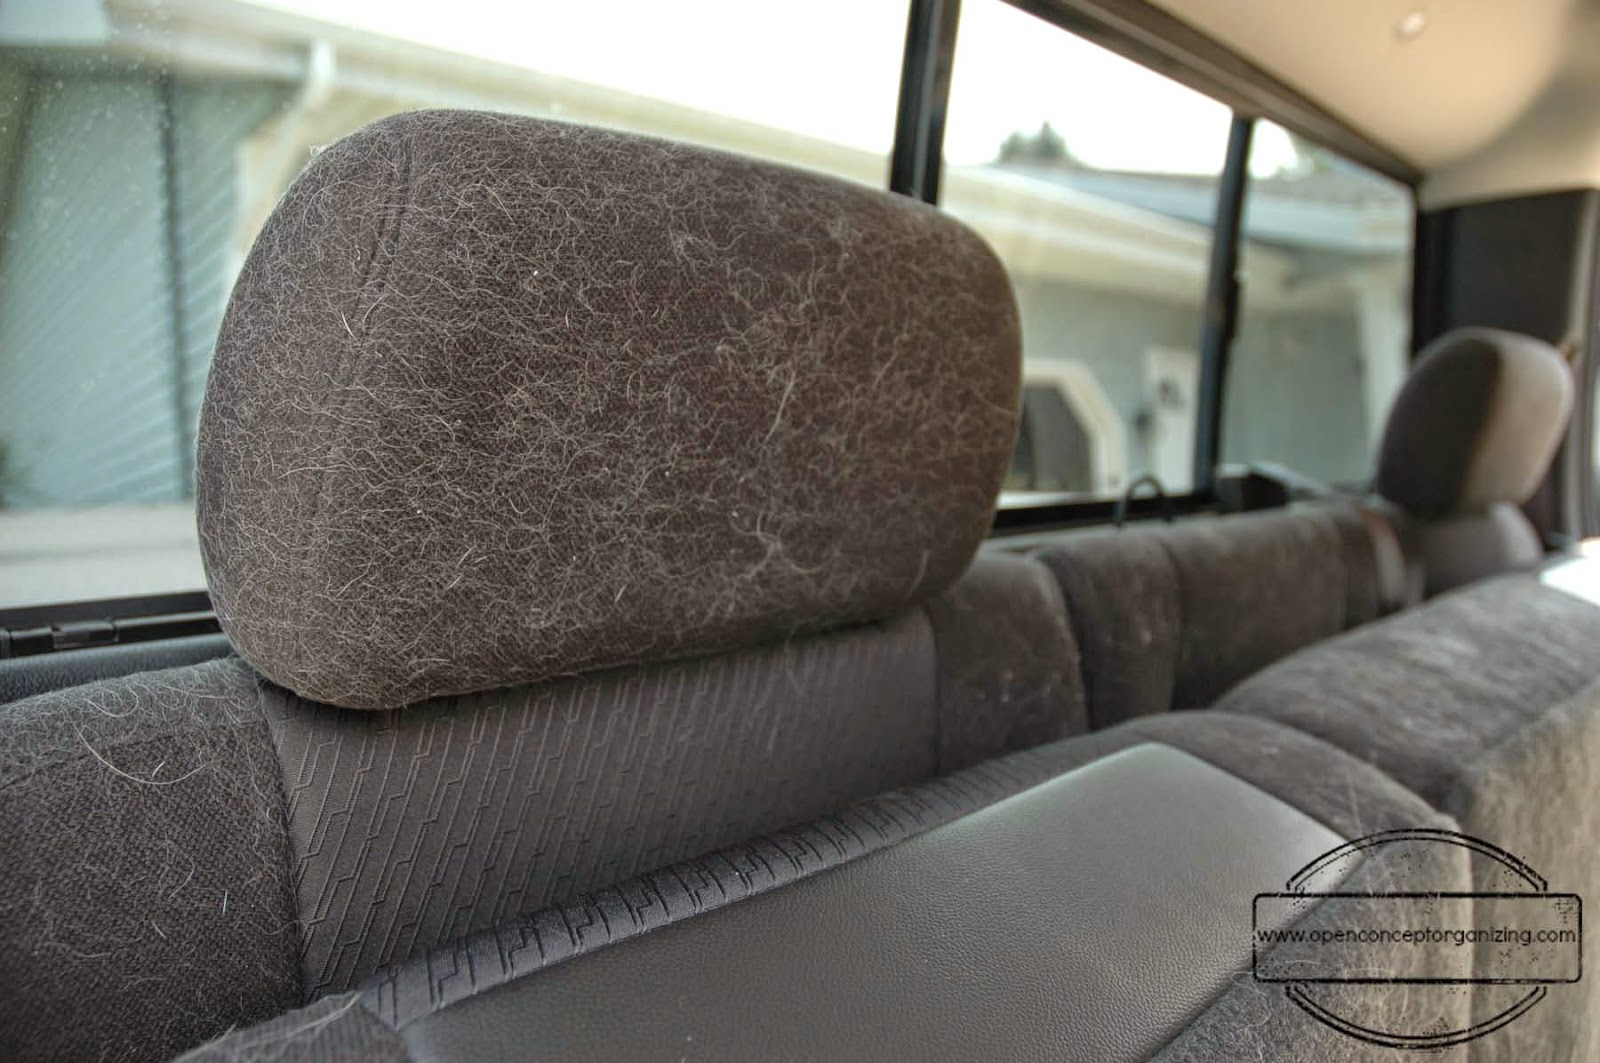
Here is the seat without the blanket...


Here is the seat after using the blanket...


Thanks to a tip from my brother, who was once a car detailer, I sprayed all of the fabric surfaces in the truck with static guard and let it sit for about 15 minutes before vacuuming. The dog hair released from the carpet and seats so much easier!

Let’s face it though, the real test of whether this hammock works is whether Mando liked it or not.
I’d say he found it rather comfy.


I actually considered sleeping back there on our way home and giving the dog the front seat… 

All in all, I spent less than $10 and saved myself 3 hours of vacuuming after each trip with our furry kid. That makes me us smile.


This post was shared in a link party over at:


The 36th Avenue         ABFOL One Project at a Time

Wednesday, August 20, 2014

How I Organized Our RV For Under $40

After spending nine days in our new-to-us RV, it was clear that some organizing systems were going to be necessary. Thankfully, organizing doesn’t have to be expensive.


When I need an organizing item, I shop my house first. Then, if necessary, I go to the dollar store or the thrift store with an open mind, and I usually can find something that will work. Sometimes finding a way to use a product other than for what it was originally intended will save you tons of moo-lah.

For example, I wanted to use an over the door shoe organizer in the bathroom to store toiletries, but the ones I found were too wide or too long or too expensive. Instead, I found a jewelry organizer for just $6 that works perfectly. It hangs on an over-the-door hook we already had.


To maintain order in the medicine cabinet, I picked up some narrow pencil baskets at the dollar store (3 for $1) to corral items and keep them in place while we travel. 


And, to avoid packing 7 different bottles of medicine every time we go camping, I also grabbed a weekly pill organizer from the dollar store and filled each pod with a different over-the-counter medicine – Advil, Benedryl, Pepto Bismal, etc. – labeling it clearly with a Sharpie.


A dollar store toothbrush holder with a little Velcro holds our toothbrushes and cups easily accessible on the counter and keeps them in place.


In the bedroom area, I found a couple fabric boxes lying around the house unused so I stashed those in the over head cabinets to hold things like bathing suits and pajamas. 


We had some hanging shoe organizers stuffed into a closet in our basement and, even though I’ve cleaned out those closets multiple times, I just couldn’t bring myself to ever get rid of them. I grabbed them and hung them in the hanging storage area and they now hold extra sheets, towels, and tablecloths.


I call hanging on to things part-hoarding, part-proactive thinking. The Mister calls it a gift. That’s why I love him.

Our food storage cabinets were organized with some baskets and bins from the dollar store keeping things from sliding around while traveling and making it much easier to find those marshmallows when it’s s’more time!


The first time I opened the refrigerator door after driving to our very first camping destination, I looked like a poorly trained circus juggler so I added some more baskets and bins in there and everything stayed exactly in its place on our next trip!


We really do camp with more than water and beer.... :)

We put our super old (and super small) TV/VCR combo in the trailer in case we have rainy days and feel like watching a movie. Our movie selection got slid into an overhead space. A tension rod ensures everything stays in place while we’re cruising down the road while a Velcro strip holds the remote in place when it’s not in use.


Deciding on my favorite organization tool in the RV is a tough one, but it definitely comes down to the paper plate dispenser and the sock organizer. 

I’ve never been more excited about a sock organizer in my life.

I used the sock organizer to hold our glasses, cups, and mugs in place; they didn’t budge! 


But, the paper plate dispenser does save so much cupboard space and makes it super easy to grab a plate when working in the kitchen or grabbing a quick snack. I say it’s a tie!


Our melamine plates did slide around a lot on our first trip so I was looking for something that would keep them all together and in place. I found a used Martha Stewart desk organizer at the thrift store for $2 and the plates fit perfectly!


To save counter space, I grabbed a shower caddy from the dollar store and hung it on the kitchen wall with a command hook. It's now our fruit holder! 


Our pots and pans are corralled under the sink and the lids are slid into a paper filing rack for easy access. Everything is kept in its place with a couple tension rods which can easily be removed while we’re settled into a camp site and put back in when it’s time to travel.


The tall cupboard by the entry has a ton of space but things often get lost because it is such a deep cupboard. Foil, plastic wrap, and sandwich bags are kept together and close to the front in a used magazine rack. 


Plastic bags for trash or doggy messes are kept in a dollar store cereal container.


A silverware organizer keeps things like solar lights, match lighters, and small tools handy in a way that keeps them from sliding all over.


The under the table storage is contained with two laundry baskets from the dollar store. While they work great, I might seek out some rectangular baskets to better utilize that space in the future.


I found some wall hooks at the dollar store and thought they'd work great to hang our dirty shoes on instead of them being strewn across the floor and tripped on. Since I wasn't 100% sure they would work, I didn't want to screw them into the wood paneling so I grabbed a couple more command hooks to hang them. Surprisingly, they worked great!


Outside, some heavy duty command hooks keep our cords and hoses off the floor in the under-storage area, making room for camp chairs and other larger items.

We used large utility hooks, often used to hold brooms or mops, to store our kayak paddles and broom on the side of our under-storage area. They are now out of the way and protected from being squashed by heavier items we stow under there. It’s not always good to be short vertically challenged, but for installing these hooks, it was a huge blessing.


$40 later our RV is adequately organized! For more RV organization tips, be sure to follow me on Pinterest!

How do you keep your camping gear in order? What items do you use outside of their intended purpose?

This post was shared in a link party over at:


The 36th Avenue

And, this post was featured over at:

   ABFOL One Project at a Time

and at

I'm An Organizing Junkie
http://orgjunkie.com/2014/09/eliminate-clutter-organized-rv-efficient-craft-room.html

Wednesday, August 13, 2014

One Big Hairy Mess

Last weekend, the Mister escaped to an out-of-town beer festival for the weekend and left me behind to tend to the house and care for the dog. 

When the Mister is away, Jen tends to clean all day. 

I think he is fully aware of this and takes off just to kick me into cleaning mode...or maybe he really does like beer.... 

Anyway, the opportunity to do some deep cleaning couldn't have come at a better time since we had just got back in town from our nine day camping vacation in Michigan's Upper Peninsula. Our truck was in dire need of some TLC. When you travel for nine days, including a nine hour trip home, you're bound to have messes - both dog and human. I was too embarrassed to take this disaster into a car detail shop, so I decided to clean it myself. I don't know how much car detailers make, but I'm certain they deserve a raise. 


We started out our trip with a large blanket in the back seat and tucked it into all the nooks and crannies to protect everything from hair, drool, water, etc but after just a few hours, the blanket was being used as a blindfold more than a barrier for dog hair...


I started my cleaning project by emptying everything out of the truck and then began vacuuming...and vacuuming...and vacuuming. The vacuum ran for so long and got so hot, I was afraid it might just spontaneously combust.

Four hours later, our truck was virtually hair free, but I could barely move my body. Hindsight is 20/20 and boy can I see clearly that our next travel vehicle will have rubber flooring instead of carpet!


After the truck was vacuumed, I moved on to clean all of the other surfaces.

Nose slime and dog spit make for some creative window decor, but if you're not into that kind of thing, a mix of vinegar and water should take care of the mess. I used a 50/50 mix but vinegar burns the nose a bit in high doses so a 60/40 or 70/30 ratio of water to vinegar might be better in a small space.


I used the same vinegar and water mixture with a microfiber cloth to wipe down the dash, air vents, door panels, and instrument panel.

Big mac sauce, spilled coffee, and jelly drips are a seat's worst enemy but my DIY carpet cleaner left our seats looking clean and smelling fresh.

When all the cleaning steps were complete, I sprayed the seats with a bit of lavender scented Febreeze to calm us all on our next trip. But I didn't stop at cleaning.

The Girl Scout motto is "Be Prepared" and after three years as a  Brownie, I believe I'm fully capable of implementing it. To combat future messes, I stashed the console with some baby wipes, tissues, and hand sanitizer. I also stockpiled some spare change, a pad of paper and a few pens, and some extra lip balm (with sunscreen of course). 

I used two cereal storage containers from the dollar store: one is lined with a plastic bag to hold trash; the second holds extra plastic bags for the trash container and for doggy potty breaks while we're on the road. 


This entire project was a great workout - my legs were literally sore for three days. It was a perfect way to work off all of those s'mores I enjoyed on our trip! 

For a short moment, I considered the idea of never allowing the dog into the truck again, but I'm a sucker for this face.


Before our next trip, I am going to attempt to cover our entire vehicle with hair repelling material sew a custom cover for the back seat to better protect it from furry elements.

How do you combat messes while traveling?

This post was shared in a link party over at:


The Idea Room    ABFOL One Project at a Time
Related Posts Plugin for WordPress, Blogger...