Monday, December 30, 2013

Paper Pile Management ~ Part 2

Just last week, I was here talking about our new filing system for all of our active files. I promised to come back and show you how we're handling our inactive files and, I try not to make promises I can't keep, so here you go!


Our inactive files are those files that paper is either no longer being added to at all or being added very rarely. These files include tax paperwork from previous years, awards and certificates, employment documents, etc. It seemed silly to me to keep these with our active files. They just clutter the drawer, making it more difficult to add to the active files on a regular basis. I decided it would be sufficient to store these inactive files in a banker's box for now. I'm not 100% settled that this is a permanent solution, but I'm trying it out to see how it works. I've learned that most organizing projects are ongoing. You set up a system and use for a bit and determine what works and what doesn't and then make adjustments accordingly. After all, you can have the greatest looking organizational system but if it doesn't work for you, it's pointless.

So, I decided to use simple accordion files for this project. These files are slim, but expand as needed. This is helpful as some of our inactive files are rather small (like tax return papers from 2006) and others are quite large (like certificates, awards, letters of reference, etc). I printed the same labels I used for our active files and affixed those to the accordion files.


Then I filled each file, keeping things in date order as much as possible. This way, I know when I file additional papers in each folder to file them in the back. I put the files in alphabetical order and put them in a bankers box. I considered wrapping the box in wrapping paper or scrapbook paper to make it a little more attractive, but since I'm not 100% sold on keeping this solution, I left it alone for now. 


This box can be stored in a closet or on a storage shelf and accessed only when necessary.


So our active files are stored in an easily accessible drawer in our future "home office" area and our inactive files are stored neatly in a box out of the way. That leaves one last project to contain our paper. I had three very large folders in that tippy filing cabinet: Trips, Wedding, Manuals. At one time, this was an easy way for me to keep tickets and souveniors, important documents from our wedding, and all those manuals that come with electronics and other gadgets. But it didn't take long for these folders to get way out of hand. In fact, while I was cleaning and purging the file cabinet, these folders kept spilling all over the table. So it's time to come up with a new solution for these items. Look for that post next week!

What do you think? How do you store files that aren't accessed often?

Friday, December 27, 2013

Lovely Linen Closet

I am very blessed with the amount of storage and closet space in our house. I've learned, however, that having a lot of storage space doesn't automatically mean having organized storage space. While our master bedroom closets are probably the biggest annoyance to me right now, I decided to start small and get our linen closet organized first.


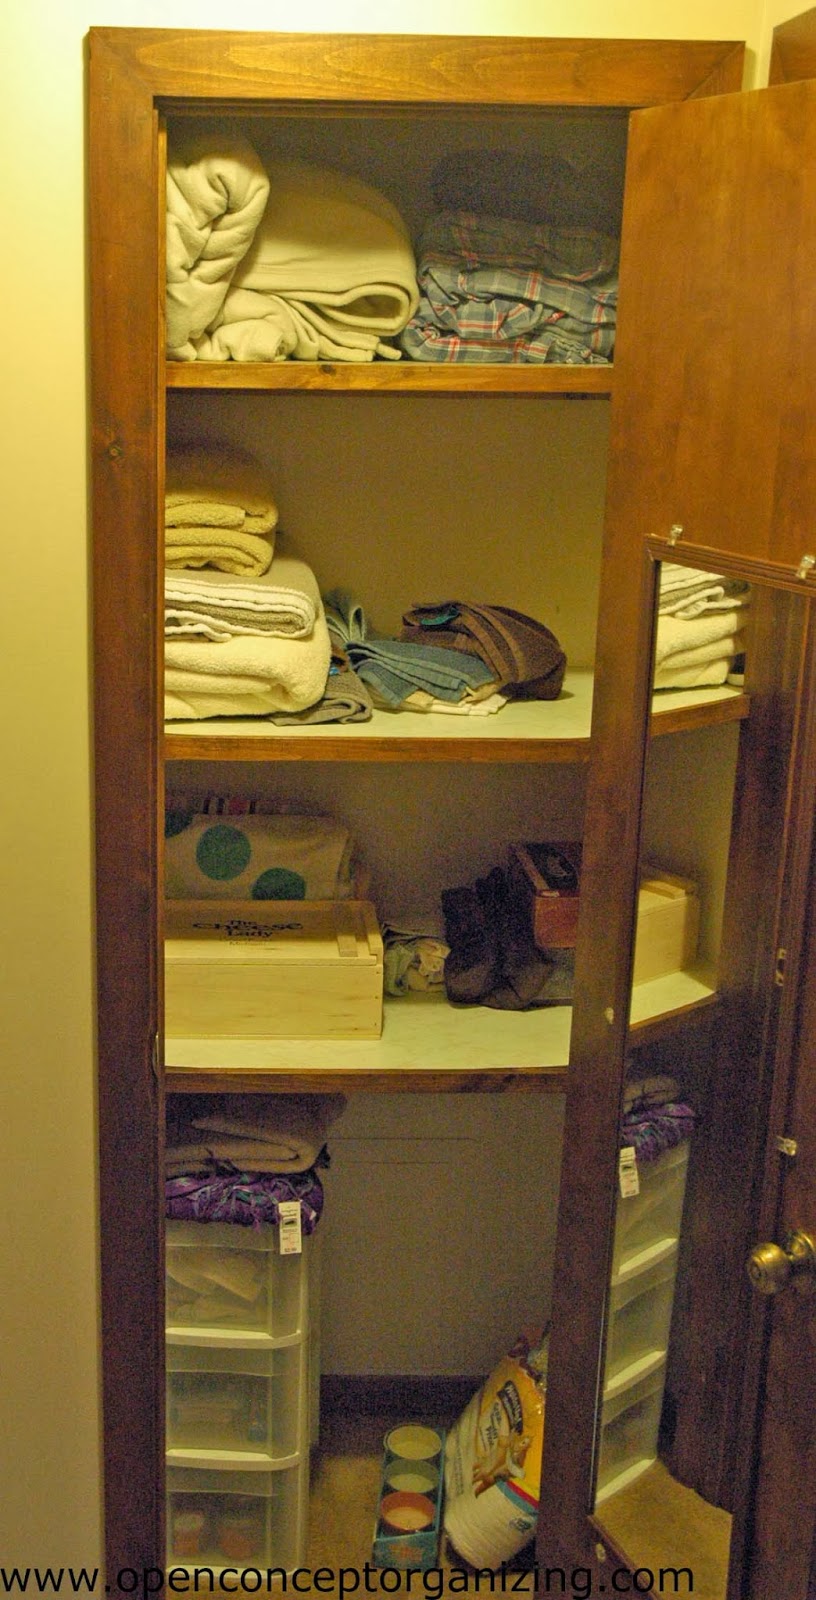
Our linen closet is a decent size and it holds bath and hand towels for our two main level bathrooms, sheets for our bed, cleaning rags, table cloths, and various other items like a neck pillow, arm slings, extra candles, and extra paper products like kleenex and toilet paper. It also holds most of our medicine items as I like to store them away from the heat and humidity of the bathroom. Well there really shouldn't be an issue fitting all of these things into this closet, it seems to be getting more and more difficult to find what I'm looking for and to get items out without other items falling on me. Here is a before photo:


Like I said, it's not bad but it's not working. I wanted to make this space a bit more functional, a bit more pretty, and an easy place that both the mister and I can grab and/or put items away easily. That being said, I was very reluctant to spend money on organizing this closet. I kept telling myself, "It's just a closet." But I've found that making spaces look nicer often prompt me to keep them looking nice. So I set myself a budget of $25. 

I emptied out the closet completely and took an inventory of what we had and what I wanted to keep in this space. I drew out a plan of the closet and looked up some ideas online as to the best way to store the items I was working with. 

The first thing I did was remove the mirror. I have never once opened the linen closet to make sure I was put together before leaving the house, nor do I particularly care what I look like when putting laundry away or grabbing a new box of tissues. 

I decided to paint the closet a light blue color. I wanted to give it some color but didn't want it to be too dark because the lighting in the hallway where the closet is located is not very bright. Blue is a common color throughout the rest of the house, so that was an easy choice. I went to Lowe's and grabbed a bunch of paint samples and picked out a color I thought would work well. Because this space is so small, I figured a quart of paint would be plenty. When I returned to Lowe's to get my paint, I happened to walk by the discounted mis-tint shelf and wouldn't you know - there sat a quart of light blue paint so close to the color of the selected chip in my hand. I picked it up and danced all the way to the check out line. $5 and I had my paint.


After painting, I lined the shelves with rubber shelf liner. Not only does this add a bit more color but it also will help to keep things in place, especially when we're pulling out towels and other items. This was $9 at Walmart.


In order to corral items in the closet and keep it organized, I knew I'd need some assortment of bins or baskets. I made a trip to the dollar store but didn't really find what I was looking for. Then I visited our local supermarket/department store and found a lot of cute baskets but at $10-$15 a piece, that wasn't going to fit in my very small budget. In a last stitch effort, I stopped into Goodwill. Baskets galore! I picked up four baskets for under $10. (I danced out of there too.)

Back at home, it was time to organize! The big basket went on the floor to hold the toilet paper and kleenex. It fit perfectly and holds these items nicely. It's also easy for me to see when we might be running low.


The next shelf holds our medicines, cleaning rags, tablecloths, and wash cloths. My mister got me a wonderful wine and cheese gift box for Valentine's Day last year and I hung on to the box knowing it'd be useful for something in the future. Sure enough, it holds all of our medicines perfectly. I considered covering it in pretty paper or painting it, but I think the raw wood and logo give the closet some character. The cleaning rags fit nicely into one of the Goodwill baskets and the table cloths are folded up next to them.


I decided to move our sheets into our bedroom. It makes sense to have them right there when it's time to change them. That left the towels and some miscellaneous items for the remaining two shelves. We have two sets of bath towels: one set of large bath sheets and one set of smaller towels. These take up a ton of space. I decided to roll the towels instead of fold of them in an effort to save space. Besides, the mister and I fold towels differently so depending on who folds the laundry (yes, he does help out!) depends on how the towels fit into the cabinet. I figured we both could roll the same! The hand towels were also folded and tucked into another Goodwill basket. 


Finally, the top shelf, which I can hardly see, holds items that don't get used very often like the neck pillow and back massage roller. 

I created labels for each of the baskets with a Stampin' Up punch and some twine to ensure everything gets put in its right place. 


Overall, I'm very happy with the way it turned out and even more happy that I came in $1 under budget!


Here is a before and after comparison:


What tips and tricks do you have for keeping your linen closet in order? Have you danced out of a store after finding a terrific deal?

Monday, December 23, 2013

Paper Pile Management ~ Part 1

Once upon a time there was a filing cabinet. Though it held files sufficiently, it was a pain to open and use effectively. Piles upon piles of paper became stacked upon it and nothing could ever be found. Then one day an organizing addict came along and ... well you get the point. 

We have had this plastic filing cabinet forever. 


It holds hanging file folders and it's on wheels so it's easy to move from one place to the next, but that is about the end of it's positive traits. 


It's hard to get into the files towards the back of the drawers because the drawers don't open all the way and, when the drawers do open as far as they can be opened, the cabinet tips over. 


Due to these annoyances, our paper filing most often got set on top of the cabinet which is not an efficient means of organizing all the paper that comes into our home. So I decided it was time for a change!


To start this project, I went through every folder and purged anything we no longer needed. Then I reorganized the remaining contents into date order. By the time I was done, I had about 8 inches of paper to shred or recycle! (Not sure what to keep and what to purge? Check out these resources: Resource 1, Resource 2, Resource 3)


I didn't want to put the newly organized hanging files back into that filing cabinet because I knew the cycle would repeat itself. At the same time, I didn't want to go out and spend money on a new filing cabinet. Luckily, I was able to find the perfect solution already in our home. We have a nice desk area built into the dining room. One day (far far from now) I imagine our office will be used as a bedroom so I'm hoping to move our office space into this built in area gradually. Behind two of the cabinet doors are these wonderful drawers, split into two compartments. The forward most compartment is the perfect size for file folders. I was hoping I'd be able to use my existing hanging file folders but the compartment is just a hair too wide. That gave me an excuse to make up some new pretty folders!


I found some traditional file folders at the dollar store priced 10/$1. I grabbed some filing folder labels at Office Max and printed them with a simple background to add some color.


I affixed the labels onto the new folders and put them in alphabetical order.


Then I put all the organized paperwork into the new folders and put them in their new home. They fit perfectly!


Organizing our paper filing didn't stop there though. As I was going through each folder and purging what we didn't need, I noticed two distinct categories: Active files and Inactive files. The active files are the ones in which paper is being added to them on a regular basis such as pet files, insurance policies, car repairs, etc. The inactive files are the ones in which paper is no longer being added to them or is only added on a very limited basis. These include tax files from previous years, certificates or awards the mister or I receive, etc. It made sense to put the active files in this new easily accessible location but I didn't want to clutter the drawer with all of the inactive files. Stay tuned for how I decided to organize those!

Does your filing system encourage you to keep paper organized, or are you in the same boat I was with a stack of paper on top of your cabinet?


Friday, December 20, 2013

Freezer Meal Friday ~ Sausage & Peppers

This freezer meal recipe really is as easy as it sounds. I was skeptical that it would be good. It seemed too simple to be anything worth making. But I was wrong, and it now has become one of the Mister's favorite meals. 


Sausage and Peppers was one of the first freezer meals I tried. I found the delicious recipe here. The first time I made it, I followed the recipe to the T. This time, I made a few adjustments:

  • 6 Italian Sausage {I used Eckrich 4 Pepper Smoked Sausage}
  • 2 Green Peppers {I used orange bell peppers this time because they were on sale}
  • 1 Red Pepper
  • 1 Large Red Onion {I used a yellow onion because it's what I had on hand}
  • 4 Cloves of Garlic, Minced
  • 2 Cans Italian Diced Tomatoes
  • 2 Tbsp Italian Seasoning {I just added some Italian seasonings like oregano and parsley and then some salt and pepper}

The above recipe makes enough for two meals. So you'd split the above ingredients into two 1-gallon freezer bags. 

I marked the freezer bags with the name of the meal and the date and then added the instructions: Cook on low six hours. Then, I chopped up the sausage, peppers, onion, and garlic and added those to the bag. 


I added the 2 cans of tomatoes, undrained and sprinkled in the seasonings. I flattened out the bags a bit and sealed them as air tight as possible.

When I'm ready to make this meal, I thaw it in the fridge over night and throw it in the crock pot in the morning. I've made this recipe served over noodles and served on toasted french bread. We love the french bread option the best, but in this instance I had yummy egg noodles on hand so it was served on those. I topped it off with some shredded mozzarella cheese.


Simple and easy, just how we like it! I hope you enjoy!

Wednesday, December 18, 2013

Dog Food Dilemma

Dog food storage typically isn't all that exciting, I know. But I'm hoping this post will make it exciting for you! For over a year now, our puppy's food has been stored in a clear plastic tote in the storage closet of the kitchen. Did it work for us? Yes. Was it as functional as it could be? No. Storing his food in the closet meant that each feeding required grabbing his dish, walking to the closet, opening the closet door, opening the two latches of the tote, getting the food, closing the two latches of the tote, closing the closet, and bringing the dish back to his eating area. Now I admit, the closet was only about 10 feet from his eating area... But I still felt like this process could be streamlined a bit.


Because his food and water dishes are located immediately as you enter our house, I didn't want to just set a battered clear plastic tote of dog food next to his dishes. Nothing says "welcome to our home" like an ugly tote of dog food. So I started looking online for some alternative dog food storage options.


Dog Food Storage Container - Simple & Cheap...
{Image Via}


woofwerks metal dog food container
{Image Via}
{Image Via}

I wanted a DIY option to save some money and because I enjoy projects. I looked into the cost of a galvanized trash can and, the cost combined with the process to paint it was more than I wanted to spend. I stopped into a local Salvation Army store and found this:


It's actually an old potato bin but I thought it would work perfectly for dog food storage. I picked it up for $20. In hindsight, I probably shouldn't have paid quite this much. The bin in the unit needed to be replaced because it had a huge crack in the bottom and the wood was pretty beat up on the top and the sides. Nevertheless, I got to work transforming this beauty into something greater.


I removed the three drawer pulls, and detached the bin from the front piece. I sanded down the entire unit not only to  smooth out some of the imperfections, but also so the paint would adhere better. I wanted to do some work with vinyl decals to add the words "Dog Food" to the front of the unit. So I hopped over to Lowe's and picked up a sample of some turquoise paint. I painted the area on the drawer where I wanted the words to be in the turquoise first.


Then I cut out some vinyl letters using my Cricut and carefully placed those on the drawer. I forgot to take a picture before I covered the whole drawer face with the brown paint I was using on the entire piece, but you can kind of see the vinyl through the first coat of brown.


After two coats of paint, I removed the vinyl to reveal the turquoise letters. (Pictures are further below.) I painted the rest of the piece brown to blend in with our entryway decor. Once the paint was dry I reattached a new bin to the front piece with four screws. It's just a simple Rubbermaid Trash Can. 


I added some new drawer pulls I picked up at Hobby Lobby on clearance and put the entire thing back together. Time to move it upstairs!

Here is a photo of our entry way before:


The storage unit there was a goodwill purchase re-painted as well. While that unit works really well for accessory storage like hats, mittens, and scarfs, it takes up a lot of space. My future project plans include adding some seating to this space and I think with a bench in this room, that storage unit will make it too cramped. So I moved the unit into the basement and used another drawer organizer I found in another part of the house to hold the accessories, which fits nicely into the closet of the entry way. 


Here is the new piece in it's new home! I love how the turquoise lettering turned out. I found that yellow bucket at The Salvation Army for $1. It works great for our keys when we come in the door. All in all, it makes feeding time much more efficient. The drawer also holds the puppy's leash so it's right there when we head out the door. Here is a final look at the space with the new dog food storage piece.


It adds character and functionality to the space. Just what I wanted!

Do you have any creative storage solutions for pet food?

Monday, December 16, 2013

Conquering Cord Clutter

Clutter is the worst. Cord clutter is the second worst. I’d like to invent a universal power cord that fits all electronic devices and become a millionaire. Instead, I settled on a DIY charging station to contain our cord clutter once and for all.


I scoured Pinterest for a variety of ideas and combined a few to get my end result: a surge protector lying in a pretty box with slots cut into it for individual power cords to file through. Initially, my plan was to use an old shoe box and decoupage some pretty scrapbook paper on it. But then I was wandering through Hobby Lobby and found a photo box for $4. With the 40% off coupon I had, it was only $2.40! That was definitely worth it for me to save the time and energy of cutting, folding, and modge podging an old shoebox. Besides that, the box was navy and cream, two colors that will fit into our eventual Master Bedroom décor. PERFECT!

My goal was to cut 4 cord slots into one side of the box. The perfectionist in me wanted each of these slots to be evenly spaced and level. When I realized my 12 inch ruler wasn’t going to fit inside my 11 inch box, I cut a piece of scrap paper the size of one side of the box and drew a template. Then I temporarily inserted the template into the box securing it with a few small pieces of scrapbook adhesive.


Very carefully, I cut out my four slots with a utility knife. Once they were cut out, I filed each one down a little so they were relatively smooth. Still not pretty, but smooth.


I found a pack of metal bookplates at JoAnn’s on sale for $2.96 so I attached those to the box with some silver scrapbooking brads. The box started to look prettier.


Finally, I printed some labels and punched them out with this Stampin’ Up punch. I attached those to the box with some scrapbook adhesive.


I have read a lot of comments and concerns online about this type of box generating a lot of heat with all those chargers plugged in. Not wanting to set my house on fire in the name of cord clutter control, I cut a few vent holes out of the back of the box. These holes will also allow the power cord of the surge protector to extend out of the box easily.


Finally, I put the surge protector into the box and fed the cord out one of the vent holes. I plugged in each charger and extended it out its appropriately labeled slot on the front of the box. Voila! Cord Clutter Conquered!


While it’s my intention to leave the chargers plugged into the surge protector all the time, the switch on the surge protector is easily accessible through the back vent holes so we can switch it off when none of the chargers are being used.


Do you have a creative way to contain your cord clutter? Have you created a DIY charging station of your own? I’d love to see your creations!

Friday, December 13, 2013

Freezer Meal Friday ~ Beef Stroganoff

I absolutely love mushrooms. Mushrooms of all kinds. Yum. This stroganoff recipe uses plenty of mushrooms and makes for an easy, delicious, warm meal. 


Of course, you could whip this up for dinner anytime, but I chose to make this meal as a freezer meal. I just combined all the ingredients into a one gallon freezer bag and stuck it in the freezer. Here's what you'll need:

1/2 cup minced onion
1/4 cup butter
1 lb. stew beef (I used ground beef)
1/8 t paprika
2 cups chopped mushrooms

3/4 cup sour cream
1 can cream of mushroom soup
1/2 cup cream cheese
1 t. salt
1 t. pepper


Once again, I was not thinking clearly (probably had mushrooms on my mind) and didn't take many pictures of this process or of the meal when it was fully cooked, but like I mentioned, it's an easy meal to put together.


I thaw the bag (usually over night) and toss everything into the crock pot in the morning. It cooks best on low for 6-8 hours. As the bag says, you can serve this meal over noodles or rice. I prefer some thick egg noodles. Enjoy!

Do you love mushrooms as much as I do? What's your favorite mushroom recipe?

Related Posts Plugin for WordPress, Blogger...