Showing posts with label Pets. Show all posts

Wednesday, August 27, 2014

DIY'ing a Doggy Hammock

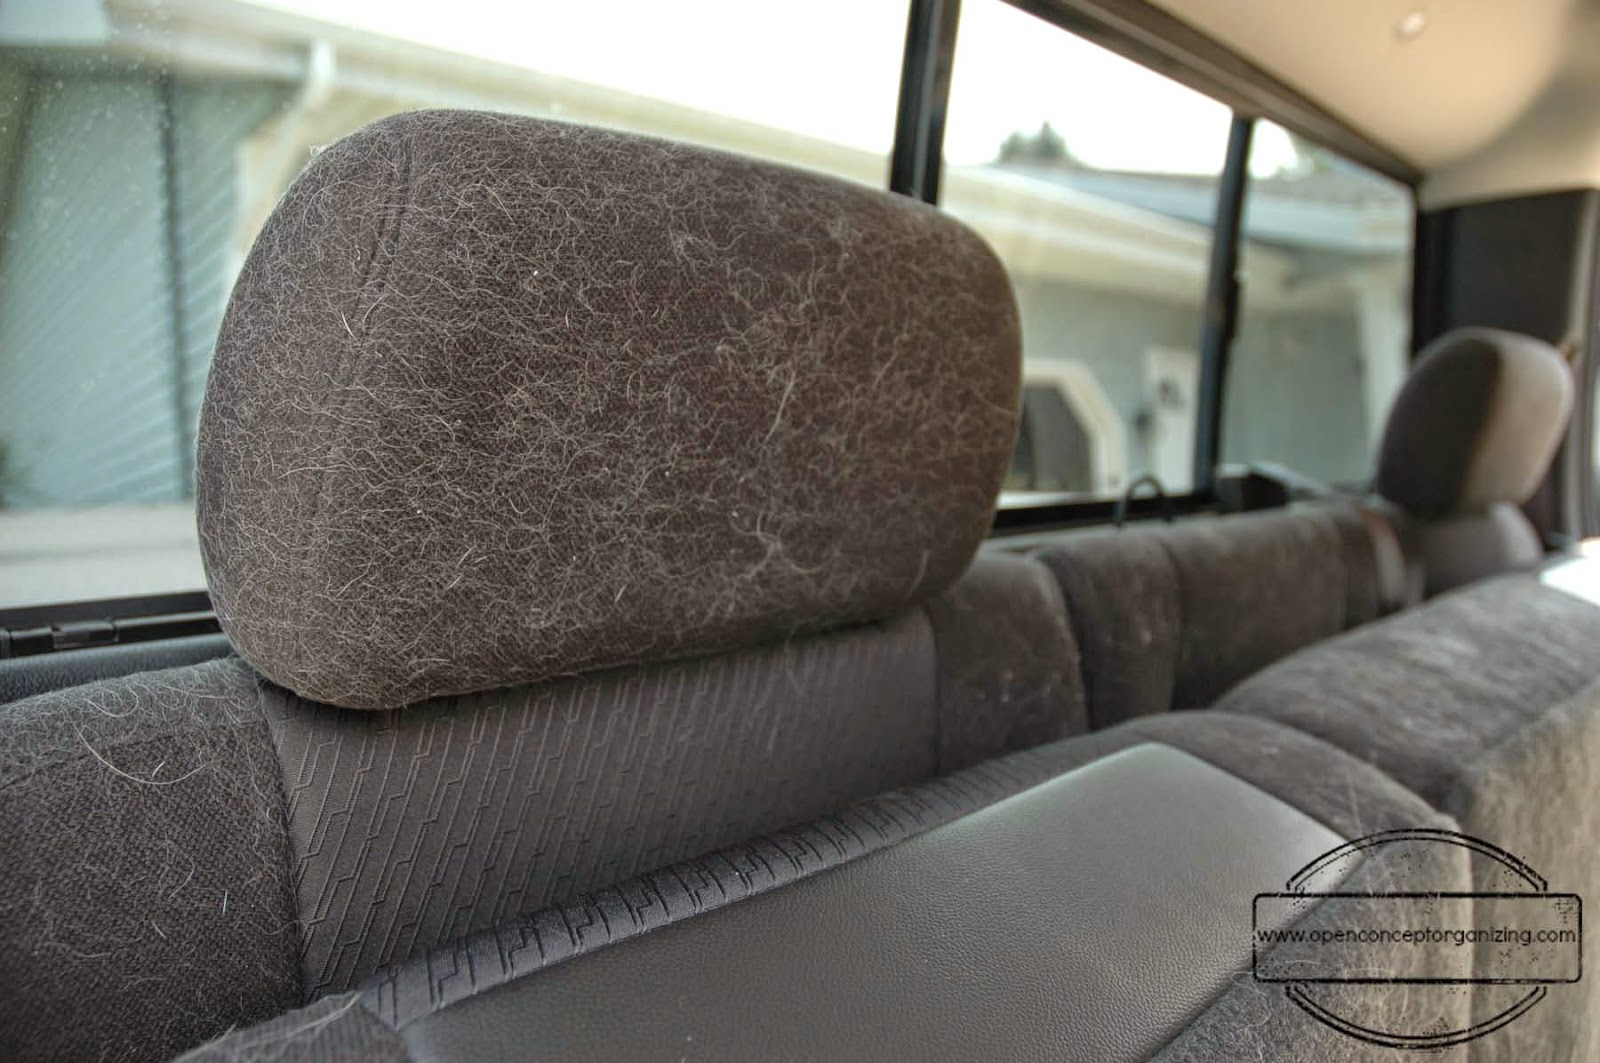
After my four-hour vacuum session to clean out our truck following our last camping trip, I desperately searched for an idea to guard the back seat from the piles of dog hair that had accumulated. I decided on a hammock style blanket. While there are some cute patterns on-line, I opted to wing it.

Before cruising over to JoAnn Fabrics for supplies, I swung into our local Salvation Army to see what was hanging out there. The local thrift stores are my bank account’s best friend…and worst enemy all at the same time.

I needed something that would get me a 60 x 90 inch rectangle in the end. Like a miracle, a 60 x 80 piece of fleece (with cute little paw prints all over it) appeared before my eyes. I also found a Twin size navy blue sheet that was large enough to make up the 10 inches the fleece was lacking and provide a back for my hammock.


I washed and dried both pieces before working with them. I started by lining up the fleece in the middle of the sheet length-wise with right sides together and then sewed along one side.


I pressed a five inch border into the top of the sheet and the bottom of the sheet to make up the 10 inch difference and then sewed along those sides. I had some extra sheet material along the remaining long edge, but I can’t cut a straight line to save my life so I folded the sheet over on itself to create a binding of sorts and sewed up the long side kind of haphazardly.

To attach the blanket in the back seat, I decided to use some nylon cording that I picked up at Hobby Lobby with a 40% off coupon.

A lot of the patterns I found on-line used buckles with the cording, but to save myself some expense and possible frustration, I figured I could just tie the nylon straps around each of our four headrests.

I cut the nylon to length and carefully melted the edges with a lighter so they wouldn’t fray. There may be a more civilized way to do that, but I'm certain it's not as fun!

I took the blanket out to the truck and marked where each strap needed to go. Then I attached each strap by sewing them onto the hammock with an x pattern to reinforce them.


The blanket lies flat on the bottom of the floor in the back seat and ties easily onto the head rests.


Since piecing together this contraption, we have had a chance to test it out and it worked really well.

It’s machine washable, so I just tossed it in the wash when we got home and spent only about half an hour vacuuming up the random dog hair that blew around the vehicle while we were traveling.

Here is a picture of the truck floor without the blanket...


And here is the floor after using the blanket...


Here is the seat without the blanket...


Here is the seat after using the blanket...


Thanks to a tip from my brother, who was once a car detailer, I sprayed all of the fabric surfaces in the truck with static guard and let it sit for about 15 minutes before vacuuming. The dog hair released from the carpet and seats so much easier!

Let’s face it though, the real test of whether this hammock works is whether Mando liked it or not.
I’d say he found it rather comfy.


I actually considered sleeping back there on our way home and giving the dog the front seat… 

All in all, I spent less than $10 and saved myself 3 hours of vacuuming after each trip with our furry kid. That makes me us smile.


This post was shared in a link party over at:


The 36th Avenue         ABFOL One Project at a Time

Wednesday, August 13, 2014

One Big Hairy Mess

Last weekend, the Mister escaped to an out-of-town beer festival for the weekend and left me behind to tend to the house and care for the dog. 

When the Mister is away, Jen tends to clean all day. 

I think he is fully aware of this and takes off just to kick me into cleaning mode...or maybe he really does like beer.... 

Anyway, the opportunity to do some deep cleaning couldn't have come at a better time since we had just got back in town from our nine day camping vacation in Michigan's Upper Peninsula. Our truck was in dire need of some TLC. When you travel for nine days, including a nine hour trip home, you're bound to have messes - both dog and human. I was too embarrassed to take this disaster into a car detail shop, so I decided to clean it myself. I don't know how much car detailers make, but I'm certain they deserve a raise. 


We started out our trip with a large blanket in the back seat and tucked it into all the nooks and crannies to protect everything from hair, drool, water, etc but after just a few hours, the blanket was being used as a blindfold more than a barrier for dog hair...


I started my cleaning project by emptying everything out of the truck and then began vacuuming...and vacuuming...and vacuuming. The vacuum ran for so long and got so hot, I was afraid it might just spontaneously combust.

Four hours later, our truck was virtually hair free, but I could barely move my body. Hindsight is 20/20 and boy can I see clearly that our next travel vehicle will have rubber flooring instead of carpet!


After the truck was vacuumed, I moved on to clean all of the other surfaces.

Nose slime and dog spit make for some creative window decor, but if you're not into that kind of thing, a mix of vinegar and water should take care of the mess. I used a 50/50 mix but vinegar burns the nose a bit in high doses so a 60/40 or 70/30 ratio of water to vinegar might be better in a small space.


I used the same vinegar and water mixture with a microfiber cloth to wipe down the dash, air vents, door panels, and instrument panel.

Big mac sauce, spilled coffee, and jelly drips are a seat's worst enemy but my DIY carpet cleaner left our seats looking clean and smelling fresh.

When all the cleaning steps were complete, I sprayed the seats with a bit of lavender scented Febreeze to calm us all on our next trip. But I didn't stop at cleaning.

The Girl Scout motto is "Be Prepared" and after three years as a  Brownie, I believe I'm fully capable of implementing it. To combat future messes, I stashed the console with some baby wipes, tissues, and hand sanitizer. I also stockpiled some spare change, a pad of paper and a few pens, and some extra lip balm (with sunscreen of course). 

I used two cereal storage containers from the dollar store: one is lined with a plastic bag to hold trash; the second holds extra plastic bags for the trash container and for doggy potty breaks while we're on the road. 


This entire project was a great workout - my legs were literally sore for three days. It was a perfect way to work off all of those s'mores I enjoyed on our trip! 

For a short moment, I considered the idea of never allowing the dog into the truck again, but I'm a sucker for this face.


Before our next trip, I am going to attempt to cover our entire vehicle with hair repelling material sew a custom cover for the back seat to better protect it from furry elements.

How do you combat messes while traveling?

This post was shared in a link party over at:


The Idea Room    ABFOL One Project at a Time

Thursday, February 27, 2014

Super Easy DIY Dog Bed

I love my dog… I love my dog… I love my dog…

I recite this to myself as I clean up stuffing, feathers, foam, and fabric.


When I buy Mando a bed, he eats it. But when Mando sleeps on the bare floor, I feel sad. Such a dilemma! I needed a solution that would give him a bed for little to no money so that, if he destroyed it, I wouldn't be mad. 


I had three old pillows stuffed in a basement closet. I had no intention of ever sleeping on them, but I didn't want to throw them in the trash and add to the landfill. 

It didn't seem hygienic to donate them for someone else to sleep on. 

I considered using them to stuff pillow shams in the guest bedroom. I've been considering that for over a year and haven’t bought shams yet.

I decided the dog could sleep on the pillows.

It seemed unsightly to just throw three dirty old pillows on the floor and, it seemed unlikely that a 76 pound golden retriever would lie still on three separate pillows to keep them in place. I needed a way to pull it all together.

I found three used pillowcases at the thrift store for $3. They generally matched and they were boy colors. It’s important to give a boy dog a bed made of boy colors.


I used my mom’s ancient sewing machine to sew the three pillow cases together. It took me 37 minutes to get the machine to work correctly and 9 minutes to sew the cases together.


I stuffed one pillow into each case and laid it next to our bed, where Mando currently sleeps on the bare floor.  


I whispered, “If you build it, they will come,” and sure enough, he came running in and laid down on the bed.

It easily slides under our bed during the day and, when we tell him it’s time for bed, he runs right to it and lies down at night.

I really do love my dog, and I’m pretty sure he loves his new bed.


Have you re-purposed an item to meet a need instead of donating it or trashing it?


Wednesday, January 29, 2014

Dog Treat Storage + a Bonus Treat Recipe

Like many pet owners, our puppy, Mando, is like a member of our family. I continue to call him a puppy even though he's 16 months old... but to me, he's still a maturing boy. :) While the Mister and I don't adhere to an organic or all natural diet all the time, we do try to watch what we eat and attempt to limit the amount of processed foods we consume. Because Mando is a full-fledged family member, I try to limit his intake of processed or unhealthy foods as much I can as well.

The main way I regulate this is by making his dog treats myself. They are super easy, less expensive, he loves them, and I know exactly what is in them. Up until now, I've stored his treats in a variety of ways including a paper bag, a plastic zip-lock bag, and an airtight storage container. The airtight container allowed them to grow mold rather quickly because it locked in all their moisture. The paper bag seems to regulate the mold growth a little better but a paper or plastic bag on the counter is blah. Besides, Mando deserves a cute treat container to go with his awesome dog food container, don't you think?!


I thought I'd share my easy project of creating a treat container for his yummy treats, and why not include the recipe in case any of you are looking for easy, natural treats for your furry family members as well.

I've made two different versions of dog treats, but this one shared by Dog-Milk.com is by far the easiest.


  • 2 Cups 100% organic whole wheat flour (I use brown rice flour which makes them a bit more crunchy and promotes healthy digestion in dogs)
  • 8 oz. of pureed natural or organic baby food (beef, sweet potato, chicken, etc).

That's it! Combine the flour and the baby food to create a thick dough. 


Roll out the dough on a floured surface to about 1/4 inch thick. 


Use cookie cutters to cut out specific shapes or a pizza cutter to make cubes.


Line a baking sheet with parchment paper and add the treats. They can be pretty close together as they don't expand much. 


Bake at 350 for about 20 minutes.Allow them to cool before putting them in your chosen storage container. An airtight container will keep them softer but will allow mold growth within a short time period. This recipe made me about 7 dozen 1-inch square treats. I like to keep the bulk of the treats in the freezer leaving only enough for about a week out on the counter. This extends their shelf life by a lot. And sometimes, Mando likes a nice frozen treat too.

The flavor possibilities of these treats are endless and you could mix and match flavors to switch it up even more. Just be sure that the baby food you use doesn't contain any ingredients harmful to dogs like onion, garlic, etc. For a list of foods toxic to dogs, check here

As for my storage project, I found this cute little jar at the Salvation Army for $1.99.


With a good washing, it was good as new. I cut out some vinyl letters on my Cricut using two different fonts and adhered them to the glass container. 


Then I filled it with treats and let it sit out on the counter. Cute, simple, and effective. That's how I like to organize!


Do you have a recipe for your pet's treats? How about a cute storage solution?
Related Posts Plugin for WordPress, Blogger...