Showing posts with label Cleaning. Show all posts

Wednesday, October 1, 2014

Fridge Liners for Under $10

Refrigerators can be a breeding ground for science projects. Without some sort of organization, food can get lost in the back corners never to be found. Well at least not until we go digging through things trying to figure out where that smell is coming from...

I try to give our fridge a quick clean-out each week on trash day so that food doesn't sit in our trash receptacle for a week breeding its own germs and horrible smells. This also helps me as I prepare our menu plan to see what food I need to use up to avoid it going to waste.

In addition to these weekly quick clean-outs, I try to do a full cleaning of the fridge once a month. I take everything out of the fridge, wipe the shelves and drawers down, and return everything in a more organized fashion. The last month or two kind of got away from me though and I was left with this mess.


It's not a bad thing to have a fridge full of food. Unless you can't find anything and all that food goes bad.


One of the reasons I have fallen behind in cleaning out the fridge is that it takes some time to empty everything out, remove the drawers and shelves, wipe everything down, and return everything. But, unfortunately, to get to all the stuck on messes and crumbs, that process is often necessary. To help combat this problem, I started looking at refrigerator shelf and drawer liners. To cover my fridge, it would cost around $30 and I just wasn't willing to spend that much.

On a recent trip to our local Dollar Tree, a light bulb went on when I saw some cute cheery vinyl place mats. 


I hurried home to measure our fridge and then went back and grabbed 7 of the place mats for $7. 

I started my cleaning project by filling the kitchen sink with hot soapy water. This way, I could wipe down all the shelves and drawers easily and also wash any containers that got emptied as I went.

I worked on one shelf at a time, removing the items, wiping down the shelf, measuring and cutting the place mats to line the shelf, and then returning the items. The place mats cut super easy with a rotary cutter and mat. I also used a yard stick to keep my lines straight.


I tossed all of the expired items and rearranged the shelves and the door compartments so that like items were together - drinks on one shelf, condiments on another, left overs together, etc.

With all the place mats in place and everything organized with other like items, things looked so much better! The fridge is bright and cheery and when messes do happen, I just have to pull out the dirty place mat, wipe it down with a damp cloth, and return it to its spot!


For just $7 and about an hour on a Saturday afternoon, our refrigerator is a much happier (and healthier place).

For other kitchen organization tips, check out my Pinterest board: Kitchen Organization


How do you keep your fridge clean and organized? Have you had a light bulb moment at the dollar store?

This post was shared in a link party over at:

ABFOL One Project at a Time   30 Handmade Days

Wednesday, September 10, 2014

Cleaning the Oven... And the Stove... And the Vent Fan...

Bacon. The Foundation of life.

At least that's what my Mister would argue.

That being said, I cook a lot of bacon which creates a lot of grease which clogs up our vent fan filter. That filter hasn't been cleaned since we moved into our house almost three years ago.

Go ahead. Say it with me. Ewwwww.....

In addition, my attempt to make what turned out to be ahhh-mazing cinnamon bread last week, left my oven an amazing disaster.

And to top it all off, our stove top gets abused on a weekly basis. Boil overs from the Mister's beer brewing, cat foot prints (grrr), food splatters, spills, bacon grease - it just destroys that poor cook top. 

I wanted to share with you my attempt at resolving all three of these dirty issues and the three magical formulas that allowed me to do just that without fumes, gagging, or an excessive amount of energy.


First, let's start with the oven. I shared a DIY oven cleaner here and that's exactly what I used this time around. I doubled the recipe to make enough paste to really cover the entire oven well. I removed the racks and slathered the paste on every square inch of that oven. I let it sit for about 20 minutes.


In the meantime, I put the racks in our bathtub and filled the tub with super hot water and about a half cup of powdered dishwasher detergent. 


I let these soak for about two hours and the gunk literally floated right off. I had to clean the tub afterwards...but hey, beggars can't be choosy right?


While the oven paste was working, I started boiling a large pot of water on the stove. Once the water was boiling, I added 1/4 cup of baking soda to the pot. Word of warning, add the baking soda s-l-o-w-l-y. I put the vent fan filter in the pot and let the water boil off all that grease and grime that had accumulated over the years. 


Since the filter wouldn't fit all the way into the pan, I flipped it over after about 15 minutes to get the other side.


Check out the icky gunk stuck in the pan afterwards!


Once the filter was clean, I rinsed it under cold water and let it dry before re-installing it.


By this time, the oven paste had sat for long enough, so I went back into the oven and wiped it all down. All that burnt cinnamon and sugar came right off. Truly a miracle. I sprayed down the walls of the oven with some vinegar to get the white film of baking soda off and it was nice and shiny again.

Lastly, I addressed the cook top. 


I sprinkled some baking soda all over the top of the stove. Then soaked a clean rag in some hot soapy water and laid it out on the stove where the worst stains were. I let it sit for about 15 minutes and then scrubbed the entire cook top with the rag and baking soda. Turned out beautiful!

Our stove/oven gets a lot of use so I know it's important to keep it clean so it will last us awhile. It's just not the most fun job in the world... But these three easy cleaning solutions made these chores much easier. I hope they help you too!


In summary:

Oven Cleaner: 5 Tbsp. Baking Soda, 4 Tbsp. Vinegar, 3 Drops Dish Soap. Spread paste. Let sit. Scrub. Rinse.

Oven Racks: Soak in hot, hot water in the bathtub with 1/2 cup powdered Dishwasher Detergent. Let sit for 2 hours (or overnight). Scrub. Rinse. Clean bathtub.

Stove Fan Filter: Slowly add 1/4 cup baking soda to a pot of boiling water. Insert filter. Let boil 15 minutes. Be grossed out. Flip filter around. Be grossed out some more. Rinse filter. Let dry.

Cook Top: Sprinkle baking soda all over cook top. Get clean rag wet with hot soapy water. Lay rag over baking soda. Let sit 15 minutes. Scrub cook top. Rinse. Let dry.

For daily cleaning, organizing, and DIY tips be sure to "like" Open Concept Organizing on Facebook!

What's your least favorite cleaning chore? Do you have any miracle cleaning solutions that save you time and money?


This post was shared in a link party over at:


The 36th Avenue      

And featured over at:

  ABFOL One Project at a Time

Wednesday, September 3, 2014

How I Cleaned My Microfiber Couch (and lived to tell about it)

I had a variety of titles to choose from for this post:

  • The Number One Reason To Keep Your Pets Off the Furniture
  • My Most Embarrassing Post Yet
  • Hey, Want To See Something Disgusting?
  • My Pile of Microfiber...Ugh

This list goes on. 

My advice of the day: No matter how cute your 10 pound puppy might be, resist the urge to let him on the couch. One day he will be a 79 pound puppy who drools, chews on bones, and leaves hair everywhere.


Enter our couch. This couch is about 6 years old. It's been through a lot. Typically, I spot clean the pillows and cushions with rubbing alcohol or my homemade carpet cleaner and that works rather well when I keep on it. 

Lately, I've failed to keep on it.

The dirty, hot, panting dog has disrespected this piece of furniture a tad too much. Tons of water spots covered the cushions, either from dog drool, literal water spills, or my impatient spot cleaning. In addition to the stains, the material had gotten a little stretched out and saggy in places too.


Ugh. I knew the couch was beyond the point of spot cleaning. It needed something more intense. I researched all over the internet how to clean a microfiber couch. Some people successfully washed their cushions, others adamantly moved for professional cleaning only. Some people attempted to remove the covers and couldn't get them back on. I wasn't sure what to believe. 

I decided to try and wash the covers myself. There comes a point where something becomes dirty enough that I'm willing to risk ruining it to get it clean. 

And when I started pulling covers off the pillows and cushions, I was even more disgusted by the yellow and brown stains on the reverse sides. I was more than ready to risk putting them in the washing machine.


I started with just two pillow covers, figuring it'd be easier to replace those if they did fall apart in the wash or get ruined. To my joyful surprise, they turned out good as new!

I washed each pillow cover and cushion cover in cold water with one tablespoon of my homemade laundry detergent (half the amount I'd use for a regular load). I washed them on the delicate cycle. Then I put them in the dryer on air dry for one hour and finished them up on low heat for 15 minutes. The covers were just barely damp when I put them back on the cushions.

Returning the pillows and cushions to their respective covers proved much easier than I anticipated. 

While the covers were washing, I took the opportunity to clean up the rest of the couch. It needed it.


I didn't find any spare change, but I found more than enough spare crumbs. No more eating on the couch, my dear Mister....


I sprayed the piles of dog hair with static guard and, after letting it sit for about 15 minutes, I was able to vacuum up most of the hair and crumbs without a problem. I wiped down the leather with my DIY furniture polish and took the opportunity to vacuum really well underneath the couch too. 

I couldn't believe the difference when it was all put back together. 


No more water spots. No more smells. 


No more wrinkles. 


It smelled and looked like new....for about fifteen minutes.


Have you dared to wash your microfiber? Did it turn out great? Is there something else you risked ruining just to get it clean?

This post was shared in a link party over at:


The 36th Avenue          ABFOL One Project at a Time

Wednesday, August 13, 2014

One Big Hairy Mess

Last weekend, the Mister escaped to an out-of-town beer festival for the weekend and left me behind to tend to the house and care for the dog. 

When the Mister is away, Jen tends to clean all day. 

I think he is fully aware of this and takes off just to kick me into cleaning mode...or maybe he really does like beer.... 

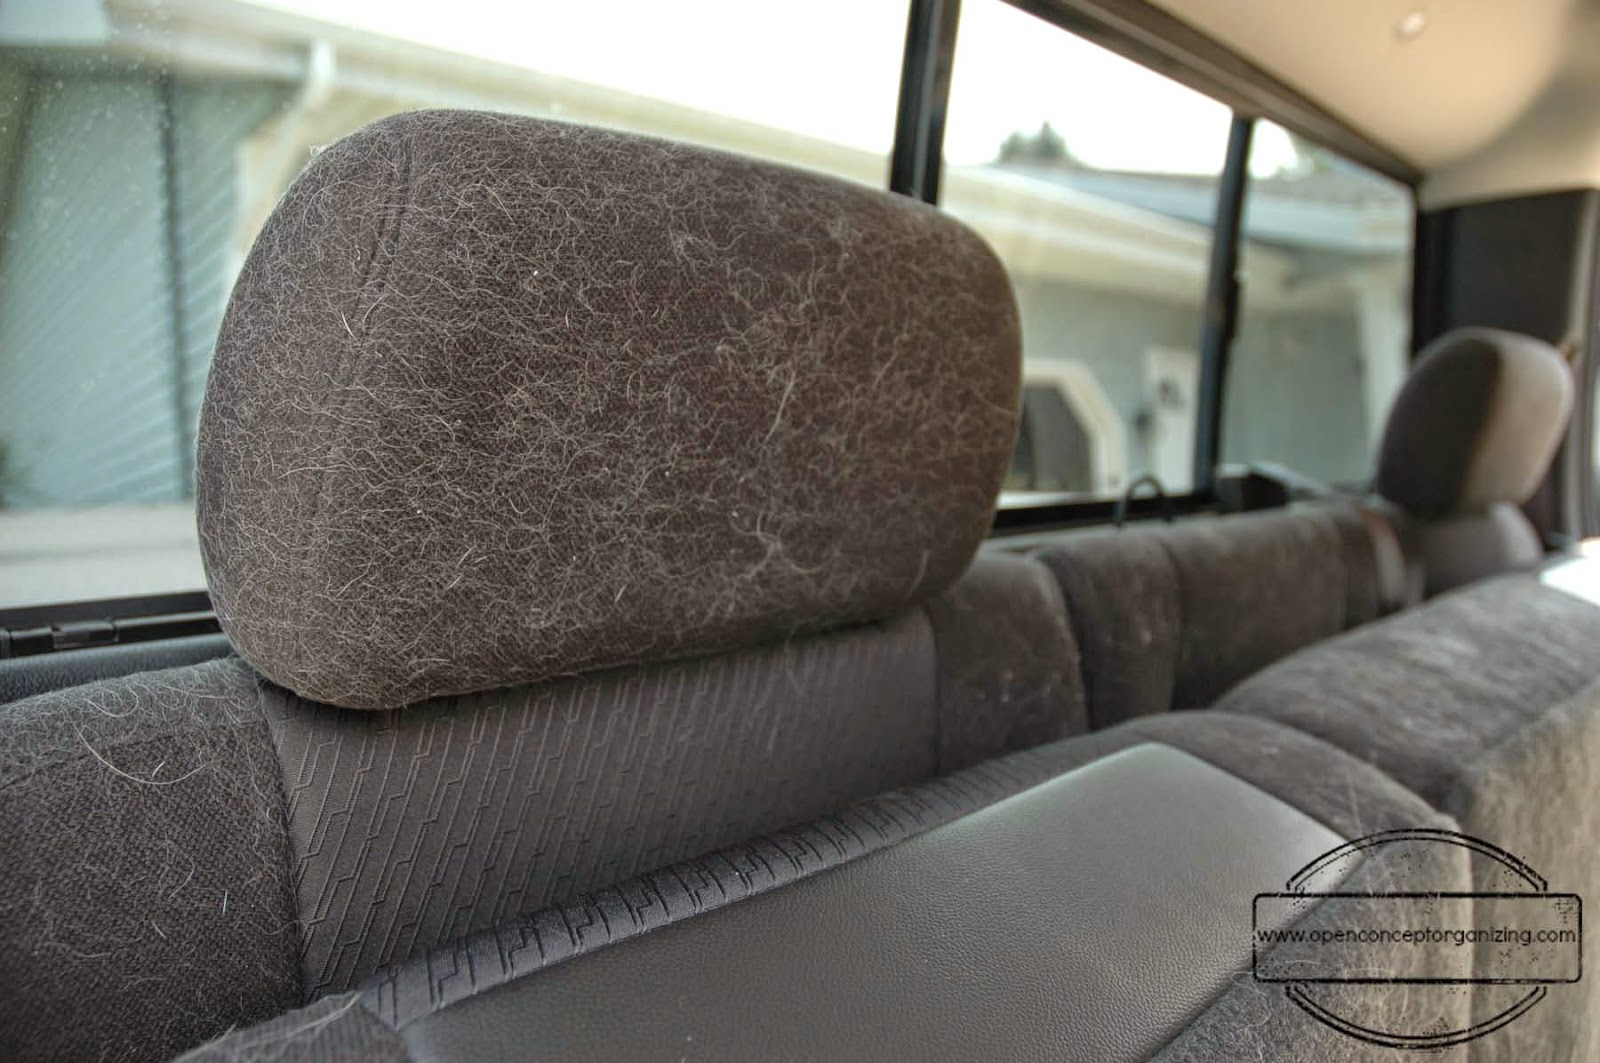
Anyway, the opportunity to do some deep cleaning couldn't have come at a better time since we had just got back in town from our nine day camping vacation in Michigan's Upper Peninsula. Our truck was in dire need of some TLC. When you travel for nine days, including a nine hour trip home, you're bound to have messes - both dog and human. I was too embarrassed to take this disaster into a car detail shop, so I decided to clean it myself. I don't know how much car detailers make, but I'm certain they deserve a raise. 


We started out our trip with a large blanket in the back seat and tucked it into all the nooks and crannies to protect everything from hair, drool, water, etc but after just a few hours, the blanket was being used as a blindfold more than a barrier for dog hair...


I started my cleaning project by emptying everything out of the truck and then began vacuuming...and vacuuming...and vacuuming. The vacuum ran for so long and got so hot, I was afraid it might just spontaneously combust.

Four hours later, our truck was virtually hair free, but I could barely move my body. Hindsight is 20/20 and boy can I see clearly that our next travel vehicle will have rubber flooring instead of carpet!


After the truck was vacuumed, I moved on to clean all of the other surfaces.

Nose slime and dog spit make for some creative window decor, but if you're not into that kind of thing, a mix of vinegar and water should take care of the mess. I used a 50/50 mix but vinegar burns the nose a bit in high doses so a 60/40 or 70/30 ratio of water to vinegar might be better in a small space.


I used the same vinegar and water mixture with a microfiber cloth to wipe down the dash, air vents, door panels, and instrument panel.

Big mac sauce, spilled coffee, and jelly drips are a seat's worst enemy but my DIY carpet cleaner left our seats looking clean and smelling fresh.

When all the cleaning steps were complete, I sprayed the seats with a bit of lavender scented Febreeze to calm us all on our next trip. But I didn't stop at cleaning.

The Girl Scout motto is "Be Prepared" and after three years as a  Brownie, I believe I'm fully capable of implementing it. To combat future messes, I stashed the console with some baby wipes, tissues, and hand sanitizer. I also stockpiled some spare change, a pad of paper and a few pens, and some extra lip balm (with sunscreen of course). 

I used two cereal storage containers from the dollar store: one is lined with a plastic bag to hold trash; the second holds extra plastic bags for the trash container and for doggy potty breaks while we're on the road. 


This entire project was a great workout - my legs were literally sore for three days. It was a perfect way to work off all of those s'mores I enjoyed on our trip! 

For a short moment, I considered the idea of never allowing the dog into the truck again, but I'm a sucker for this face.


Before our next trip, I am going to attempt to cover our entire vehicle with hair repelling material sew a custom cover for the back seat to better protect it from furry elements.

How do you combat messes while traveling?

This post was shared in a link party over at:


The Idea Room    ABFOL One Project at a Time
Related Posts Plugin for WordPress, Blogger...