Friday, November 29, 2013

Freezer Meal Friday ~ Chicken Chili

When I decided to start this blog, I created a focus statement for myself to ensure that each post topic I came up with fell under this focus and the blog maintained a certain theme. That theme is openness. As I mentioned here, openness includes being open to try new things and staying organized to maintain that openness. 

While I've always done some sort of meal planning before heading to the grocery store, the concept of make-ahead freezer meals is fairly new to me. Creating multiple meals in one afternoon and freezing them to enjoy in the future has been a huge time saver for us and has also allowed us to save money on our grocery budget. In an effort to not eat the same meal over and over again, I've been working to branch out my freezer meal recipes and try new things.

I thought it would be fun to share these freezer meal recipes with you so that you too could try them out. While I often make multiple freezer meals at once, I'm choosing to share one freezer meal with you at a time for now in an effort to keep it simple and not overwhelming.


Today's freezer meal recipe is Chicken Chili. I found the original recipe while doing "research" on Pinterest here. I had a white chicken chili recipe that I've loved for a few years but never tried it as a freezer meal. After trying this one, I think my old recipe is going to have to be  replaced. This chili is delicious.

Here is the recipe:

  • 2 chicken breasts 
  • 1 can diced tomatoes 
  • 1 can corn kernels, do not drain 
  • 1 can black beans, drained and rinsed 
  • 1 pkg. Ranch dressing mix 
  • 1 T cumin 
  • 1 t chili powder 
  • 1 t onion powder 
  • 1 8-oz pkg. cream cheese
  • Cook on low for 6 hours or high for 4 hours. 

Before I start combining ingredients, I label my bags with a sharpie, listing the name of the meal, cooking instructions, and any serving instructions I might forget by the time I eat the meal. I also include the date the meal was created in case it gets lost in the bottom of the freezer somehow. 

For this meal, I cut up the chicken into bite size chunks and combined all of the ingredients in a one gallon size freezer bag. I flattened it out a bit so it can be easily stacked in our chest freezer and tried to get as much air out as possible. 


When I decide to make the chili, I will take it out of the freezer the night before and let it thaw in the fridge over night. Then, in the morning before heading out to work, I dump it into the crockpot, set the timer and let it cook. I come home to a hot, delicious meal ready to eat! Typically, I'll whip up a batch of Jiffy cornbread to enjoy with this chili. 

If you are interested in seeing more of my freezer meal recipes now, you can visit Pinterest here!


Do you have any good freezer meal recipes you'd like to share?

Wednesday, November 27, 2013

Give the Gift of Organization

The annual gift-giving season is upon us and, if you’re like me, you’re racking your brain to choose the perfect gift for everyone on your list. Being an organization lover myself, I put together a list of gift ideas centered on organization. 


Whether you’re buying for someone who is highly organized already or someone who may need a little help in the organizing department, any of these items would make great gifts. Here they are in no particular order:


Things are not only what they seem! I actually picked up one of these at a garage sale this past summer and I love it. While its original intent is to keep file folders organized, it has many other uses. I am currently using mine to store baking sheets in a cupboard. It keeps them separated and easy to access. No more digging through a horizontal pile of baking sheets looking for the one you need! It could also be used to store pot lids, Tupperware lids, or cutting boards. The list is endless!


A label maker is an organizer’s best friend. Use it to label shelves, storage totes, file folders, wires, cables, clothing, uniforms, food storage containers, etc. The laminated tapes that this model uses can be used in hot and cold environments as well as indoors or outdoors.


I found this item at The Container Store and I fell in love. Currently, my gift wrapping station consists of a tote box filled with gift bags, ribbons, tissue paper, and wrapping paper most of which is crinkled and bent from such poor storage. It’s a pain to find anything and I often end up buying unnecessary items because the item I’m looking for is buried in the tote. This portable gift wrap station stands up on its own when in use so you can easily find everything you’re looking for. And when you’re finished, it hangs neatly in a closet until next time. Worth every penny I’d say!


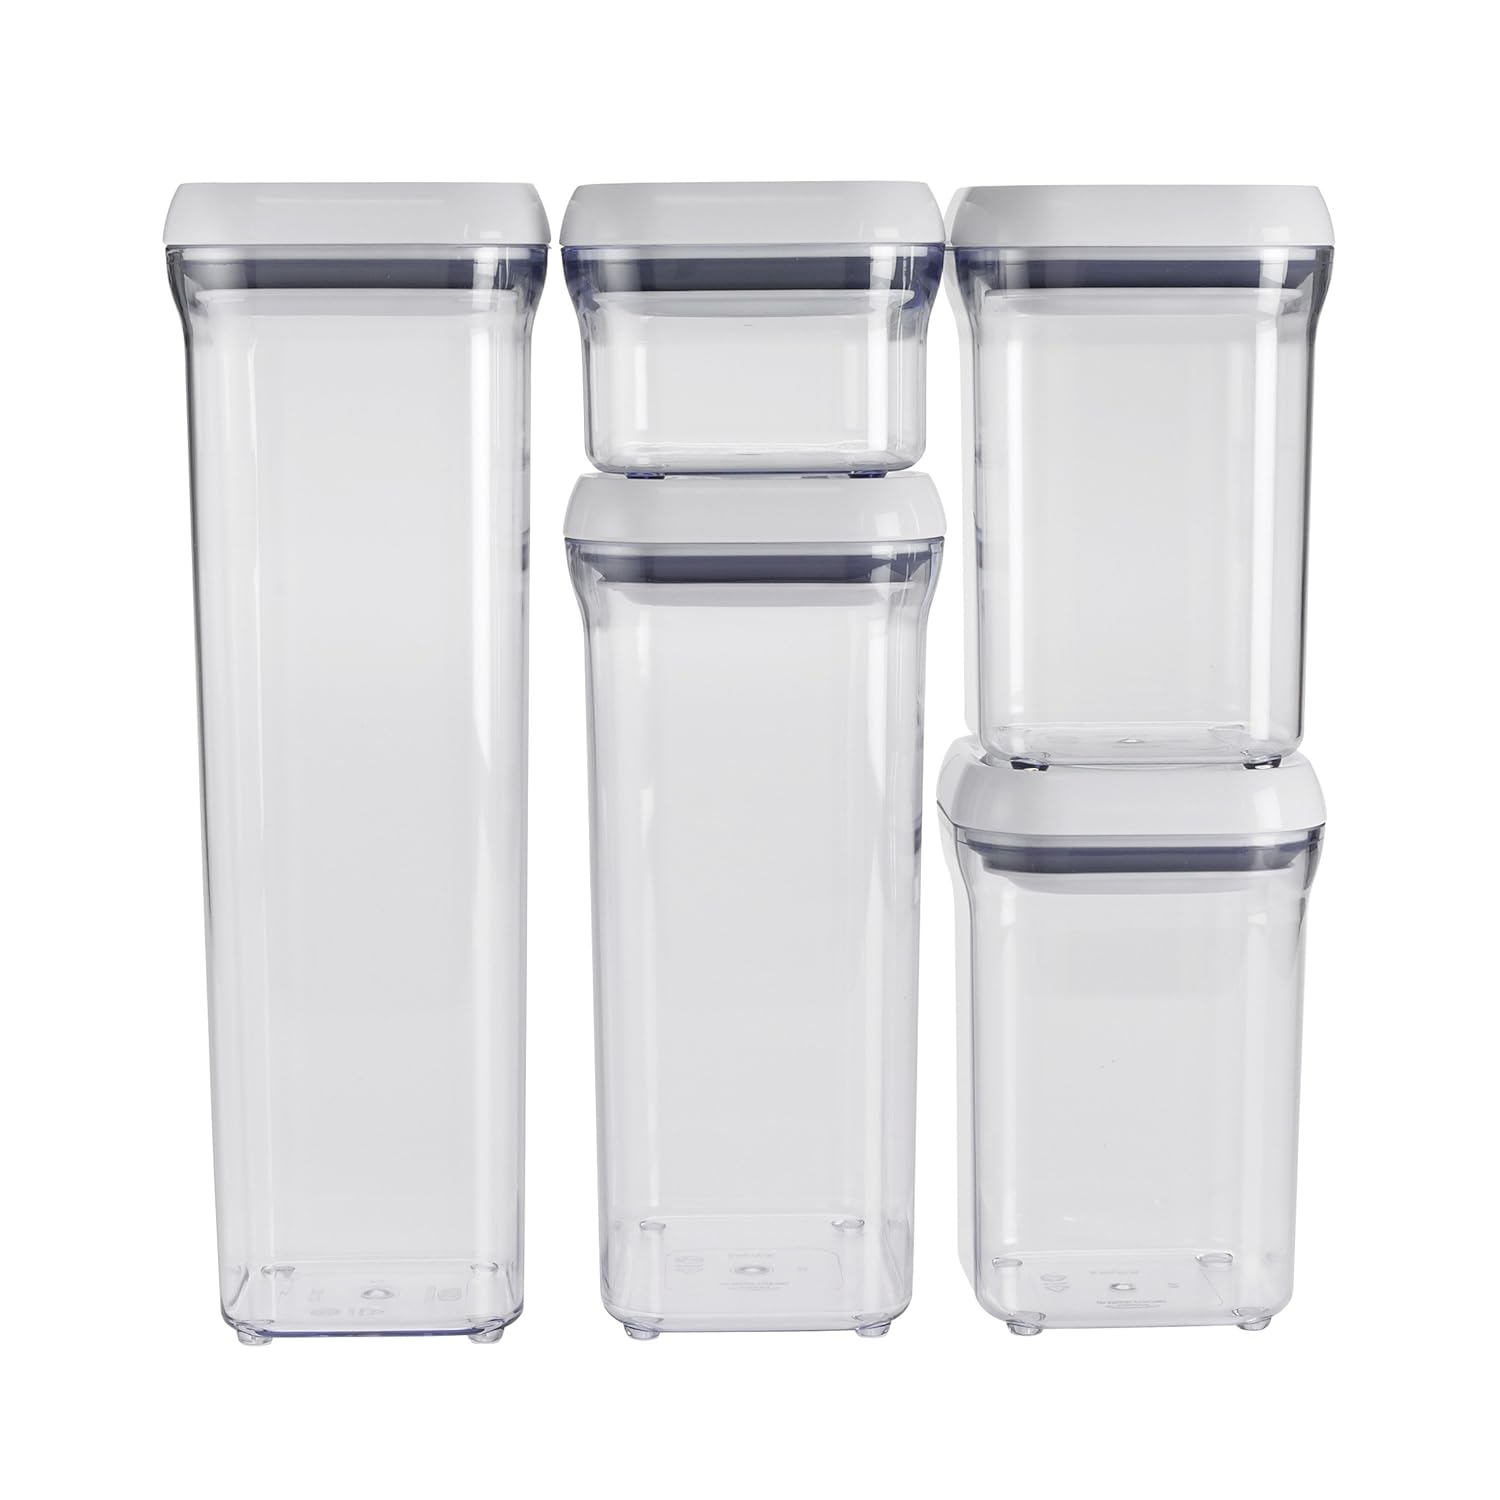
I love, love, love these containers. They are BPA free and provide an airtight seal. They stack nicely and come in a variety of shapes and sizes. They are an exceptional item for organizing a pantry. My set currently holds our coffee, pasta, dog treats, and baking supplies like flour and sugar. The only problem I have with them is that I don’t have enough! They are not dishwasher safe, but if you’re using them to store pantry staples, they don’t need to be washed very often.


These days, reusable bags are the way to go. But sometimes you end up with a slew of those plastic bags flying around your closet any way. This handy wall mount bag holder corrals all those bags and allows easy access when you need to recycle or reuse one. Genius!


What lovely lady doesn’t need a way to organize all her shoes?! This model hangs over the door so there is no need to drill holes in a wall or closet door. Have shoe storage under control? This handy organizer can be used to store cleaning supplies, toys, stuffed animals, jewelry, scarves and other accessories, pantry items, etc. I think I’d like four please!


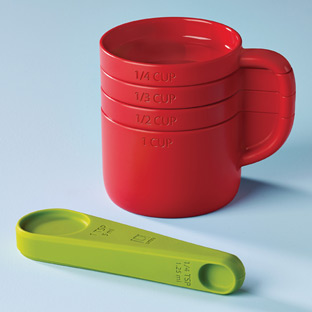
How cute is this? Better yet, how functional is this?! This measuring cup and spoon set not only eliminates the need for a large amount of storage space but also ensures you won’t lose that pesky little ¼ teaspoon. The measuring cups all fit together into the shape of one mug and the measuring spoon has all your measurements on one spoon! Two thumbs up for this gift!


I know what you’re thinking… Who wants a drawer organizer for Christmas? This deluxe drawer organizer is the exception. The kit comes with a non-slip base mat that you can cut to fit any drawer. Then you get “divitz” which keep utensils, cords, pens, etc in their place. It comes in six different colors and will revolutionize the way you organize those drawers.


Card Holder Tree

About this time, those wonderful holiday greeting cards start showing up in the mailbox. Some are traditional cards with beautiful pictures and well wishes and others are shiny new photos of family and friends. Either way, those beauties shouldn’t end up piled on a shelf somewhere. After all, how can you enjoy them day after day when they’re scattered or stacked? This holiday greeting tree solves that problem. Keep your cards on display for as long as you like without them getting in your way or lost in the holiday shuffle.

10. Owl Bin


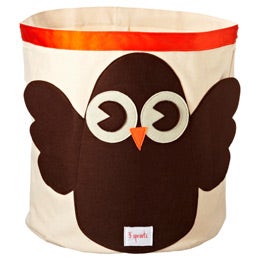
Last, but certainly not least, especially in the cute department, is this adorable owl bin from The Container Store. Is there a cuter way to store toys in the play room or corral them at Grandma’s house? It could hold laundry, or Legos, or building blocks. It could be used in a craft room to hold fabrics or books. There is no limit to this cuteness. It also comes in a raccoon, elephant, and monkey version.


Avoid giving the gift of clutter this Christmas and help someone get organized! To see more organization related gift ideas, visit my Pinterest Board here! Happy shopping! 

Note: Some of the above links may be affiliate links, meaning, at no additional cost to you, I may get a small commission if you make a purchase.  The affiliate program does not affect my decision of what products to share. I only feature items I would link to with or without an affiliate link. These items and my opinions about them are my honest to goodness personal thoughts and feelings. The Amazon Services LLC Associates Program is an affiliate advertising program designed to provide a means for sites to earn advertising fees by advertising and linking to Amazon.com. Thanks for your support!  

Monday, November 25, 2013

It's Quite Easy Being Green

When my hubby and I first sat down and created a budget, our allotted amount of money dedicated to groceries also included anything I’d buy at the grocery store, including cleaning supplies. I enjoy food too much to be content with the fact that the expense of cleaning products diminished the money left for actual food. So, I started looking at cheaper alternatives for cleaning supplies.


I grew up in a house with Pledge, Windex, Scrubbing Bubbles, and other name brand products and it was hard for me to believe that handmade or natural cleaning products would work just as well. I weighed the potential benefits:

  • Natural products mean less chemicals in our home
  • Less chemicals mean less toxicity to us and our pets
  • Natural cleaning products seem to be multi-functional so I wouldn’t need as many products, therefore, I wouldn’t need as much room to store them
  • Natural products are cheaper than purchasing the chemical-induced ones

These benefits were great enough for me to run the risk that they wouldn’t work. So I bought a few of the staples and whipped up the following three products.

Carpet Cleaner


I discovered a carpet cleaning formula here. With a cat and a very active puppy, plus five nieces and nephews, and our own tendencies to be klutzy, carpet cleaner is a product we use a lot. Regretfully, I confess that we do let our pets on the couch, so I’m constantly cleaning dog hair and drool off the cushions and pillows. We also take our puppy on many car trips so we often need to clean the seats in our cars as well. I must say this carpet cleaning concoction has not let me down! 

Here is the recipe:
  • 2 tsp dishwashing liquid
  • 2 tbsp white vinegar
  • 2 cups warm water
  • 2 tsp baking soda

This has taken dog blood out of our carpet, various stains out of our cloth auto seats, and stains and drool off of our microfiber couch without ruining any fabrics. Thumbs up to product numero uno.

Furniture Polish


My second product was furniture polish. I found a formula here. I needed a formula that would work for various types of surfaces including real wood, veneer, and metal. Again, the pets create a lot of dust/dander/pet hair on our surfaces so having a cheap and easy furniture polish that smells good and keeps the surfaces dust free for at least a few days was essential. 

This formula has done just that. I’ve been able to use it on any surface needing dusting without damage. It does smell good and I don’t notice a need to dust any more often than I did when using a name brand furniture polish. The key tip with this product is that it needs to be shaken before use and occasionally while you’re using it because the oil and water do separate easily. 

Here is the recipe:
  • 2 tsp olive oil
  • 2 cups water
  • 1/4 cup white vinegar
  • 1 - 4 drops of an essential oil for scent

Two thumbs up for product two.

Window Cleaner


Lastly, our windows are constantly a mess. The puppy smears his nose along the front windows while watching a squirrel cross the yard and finds it necessary to lick the sliding glass window and rub his nose all over that as well. When our nieces and nephews visit, their hands always seem to find their way to the windows too. And, when we take the puppy for car trips, his nose and drool destroys our car windows. This recipe has worked great for all of the above as well as regular cleaning of mirrors and other glass surfaces:

  • 1 cup white vinegar
  • 1 cup water
  • 1 tsp dish detergent

You guessed it, I'm all thumbs up for number three.

The significant savings these three products provide result in a nice increase of our food budget. Here is a simple cost comparison:


Store Bought
Homemade

Window Cleaner

$2.99 for 26 oz.
$0.26 for 32 oz.

Carpet Cleaner

$4.44 for 22 oz.
$0.13 for 17.4 oz.

Furniture Polish

$4.19 for 9.7 oz
$0.15 for 18.2 oz.

Once I tried out these three formulas and realized that my doubts were clearly proven wrong, I decided to make labels for the blank spray bottles (each $1 at our local dollar store) that included the name of the product and the recipe for each one. This would make it easier to refill the bottle when it was empty. To make my labels “water-proof”, or protected from minor spill-overs when creating the formulas, I covered each label with packaging tape on the front and back and then attached them to the bottle with more tape. 


https://mail.google.com/mail/u/0/images/cleardot.gif
Now that I have grown to love these three products so much, I’m looking to expand my natural cleaning products. I will share those formulas with you as I find and test them out!

Do you have any natural cleaning solutions that work wonders for you?

Friday, November 22, 2013

Binders, Budgets, Bills... Oh My!

Being newly married and buying a house created the necessity for us to build a new family budget. I am very blessed to have a husband who thinks the same way about money as I do. We’re not afraid to spend it in smart ways but are always looking for a bargain or a way to save a few pennies. I came across a blog post from Toni at A Bowl Full of Lemons that gave a great week-long tutorial on creating a budget binder. I took this project and ran with it and we now have a successful working budget for our family.


I highly recommend following the original week-long tutorial if you are interested in putting together this binder. Here, I've simply summarized my process and how we tweaked it to fit our needs. 

Using Microsoft Excel, I created a workbook with many tabbed worksheets. First, I started by gathering all of our account information for each bill paying account we were responsible for. I made a list of each company, their phone number and website, our account number, our online user name and password, our monthly payment amount and due date, and the frequency of that payment (monthly, quarterly, annually, etc). 

Next I put together a list of monthly due dates for each expense to better track what bills would need to be paid from what paycheck each month.

Saving money is hard. But tracking savings makes it more of a fun challenge. I created a worksheet to track our income as Toni suggests, but I also added a Savings Tracking sheet. The Mr. and I have several things that we are saving for including his tuition, a truck, and a remodeling project for our basement. Seeing our savings grow each month provides great motivation and helps us to contribute as much as we can to these funds so that we can write in larger numbers at the end of each month on our worksheet. 

While saving is difficult, paying off debt also presents a challenge. I created a worksheet listing our debts so that we could track their payoff. This worked miracles as we paid off my student loan debt in a matter of months simply because we were tired of it showing up on this chart.

Toni adds a step in creating an annual expense worksheet in which all annual expenses are listed and then divided by 12 to determine how much to set aside each month so when the bills come due, the funds are there to pay it. Auto registration fees, warranty fees, and our snowplow service are just a few examples of these types of expenses. When my birthday comes around next year, I won’t be sidetracked by that notice of renewal for my auto registration anymore. I’ll have the money already saved to just pay the bill and move on!

Lastly, I created a sheet of minimum monthly expenses and then an average monthly budget. The binder holds tabs for each month so at the beginning of each month we tweak our monthly budget to fit that particular month’s estimated income and expenses.


Here are some benefits of having this budget binder:
 

•    It has helped us track (and increase) our debt payoff. We are using Dave Ramsey's Snowball method but any plan helps.
 

•    Tracking our savings has caused us to second guess unnecessary spending, knowing that if we save that $10 on popcorn at the movies, our truck savings fund will go up.
 

•    The flexibility to adjust our budget each month while maintaining our savings and monthly fixed expenses is so helpful. Some months we may know the dog needs to go to the vet so we increase our spending there and decrease it somewhere else, like the vacation fund. 
 

•    Lastly, we both know where to find our financial information. It’s in the bright green binder on my desk. If my hubby needs to know how much money is available for his hair cut, he can check and see if it’s there. If I need to see where we’re at with the grocery budget for that month, I just pull out the binder and see how much I have left to spend.

Thanks to Toni for posting this great project and providing motivation to get our finances in order! She also has her entire budget system available for sale for $10 which includes 15 beautiful PDF printable worksheets to create your own budget binder.


What do you do to keep your budget on track?

Wednesday, November 20, 2013

The Last Two Years in 740 Words or Less!

I thought it’d be fun to play one of those ice breaker games to help us all get to know each other better, but trying to find someone who has climbed Mount Everest or someone who is currently wearing an NFL t-shirt is a bit difficult in the blogging world. So to help you get to know a bit more about me, I’ll start with the story of how our home became our home.  


Our house hunt started quite randomly while out driving one weekend. We saw an open house and decided to check it out. The rest is history, as they say. We got the home buying itch, but we were not yet Mr. & Mrs and were both in the middle of apartment leases so we weren't in a huge hurry to find anything. We met a Realtor at a random open house, she took down our contact information, and called us a couple weeks later regarding another house she was showing. The property had been on the market for a bit and the price was just reduced. We agreed to stop by and check it out.

Until then, the only “feeling” I had gotten from the houses we had looked at was a growing anxiety that what I thought I wanted didn't exist. When we walked through the front door of this one though, my heart went pitter-patter. I was surprised because the inside of the house wasn't necessarily what I had been looking for. While some areas, like the bathrooms, had been recently updated making it feel a bit more modern, other rooms seemed a little dated, but they still felt cozy. The house was big enough for us to grow into (2600 sq. ft.) and had a large yard (1.75 acres). It’s hard to explain, but I just felt peaceful there. It didn't take long to decide this would be our house and we closed on the deal in November 2011. 

I remember the day we moved in because it’s also the day my Mr. proposed! I will have to share that story in another post…


So we've been in the house for almost two years, and we are just starting to do some work on it now. Why the wait? Well, two weeks after we bought the house, I got notice that I was getting laid off from work. Talk about a shock. I bought a house, got engaged, and got laid off all in one month’s time. Fortunately, I was only out of work for a week. I took a temporary assignment for a few months and found a new full time position shortly after. Once the anxiety of being unemployed was resolved, I was in full wedding planning mode. We set a date for September 22, 2012 and there was a lot to be done! I managed to put up some pictures and set out some accessories from each of our apartments but that is as far as I got in decorating. In fact, as of today, there are still empty picture hooks on the walls from the previous owners.

Once we were married, my Mr. had four busy months of finishing up his Bachelor’s degree and then we escaped for a week on our honeymoon in Punta Cana.
January to present has been quite a whirlwind. We've gained two nephews and a niece and got a new puppy. I decided to start my professional organizing business and blog and my hubby has started a Master’s Degree this fall. Whew! When does life slow down exactly??

It’s been nice to take some time to settle in. But now, little things that I could deal with before are starting to stare me down chanting, “Fix me!” As the ideas begin swirling and the energy begins building, I am so excited to share the progression with all of you.

I just completed the process of going through each room and very aggressively purging. I threw out, donated, and held a garage sale. With each room de-cluttered, it will be easier to go back in and organize what is left and update where necessary. Thanks for coming along on the adventure with me!

What project has life postponed for you that you’re excited to get started on?

Monday, November 18, 2013

Hello & Welcome!

Hello there! I am so grateful that you have taken some time to visit this new corner of the World Wide Web. My name is Jen and I am the owner and blogger at Open Concept Organizing. Writing and organizing have come naturally to me for as long as I can remember. I operated my own house cleaning business to pay my way through college and have always been one of the most organized employees in my career endeavors since. I feel most energized and driven when I am completing projects like budgeting worksheets, spreadsheets, to-do lists, and cleaning and organizing various spaces. After a stressful day at my "day job", you will find me relaxing by cleaning and straightening up my home.


Organizing a home often gets squeezed in (or out, really) to the hustle and bustle of daily life. Many other things take priority and before we know it, we're trapped under a pile of "life clutter". I've experienced this over the last year and a half after struggling with an unexpected layoff from a job I loved. While I was quickly blessed with a new position somewhere else, I've spent a lot of time contemplating my purpose - what is it that I am meant to do. Not only am I continuously drawn back to writing and organizing, but I'm learning about how important it is for me to stay open.  While my focus on this blog will mainly be residential home organization, my vision is a site devoted to openness: open, clean, organized spaces; opening myself up to new challenges and opportunities and encouraging others to do the same; being open to change, open to improvement, open to trying new things; and organization of all things to maintain that openness. This might include organizing a home, a fitness routine, a diet or menu plan, a vacation, etc.

There is already a wealth of information out there on the internet regarding organizing and there are many fantastic blogs that address this topic daily. It is not my goal to trump any of those existing sites but instead to add to the community that already exists. I don't believe that any one person can possibly have all the answers. That is why you'll find links to blogs I enjoy as well as other resources on my pages. If I can't help, I will do my best to find someone who can! Check out my blog roll in the sidebar for some of the great blogs I try to read daily. I hope to provide additional insight and ideas, make new friends, and encourage others in the wonderful world of organization.

I’m thankful for the support I have in starting this new challenge. Without that support and encouragement, this idea would remain stuck in a notebook somewhere collecting dust. So thank you to my Mr. who encourages me in my writing every day. Thank you to my family and friends for their support and willingness to volunteer their spaces for me to “practice” organizing. Thanks to Pat Raap at Raap Signs for helping me to create my logo. And thank you to all of my new friends that I anticipate meeting through this adventure. I appreciate your willingness to read, support, and share on this site. If you have tips or inspiration, this can be a place to share them. If you need tips or inspiration, this can be a place to get them.


My Mister & I
Please do not hesitate to leave comments, offer feedback, subscribe by e-mail or e-reader, and join me on Facebook or Pinterest.


Related Posts Plugin for WordPress, Blogger...